Caption manager
Caption manager is a free online device creating files that display subtitles on videos.
The input data is a set of transcription files created by a service such as DeepTranscript — Otter.ai and WhisperTranscribe are alternate options — and optionally corrected with Grammarly.
Because WhisperTranscribe creates subtitle files directly (in VTT or SRT format), you may not need Caption manager to create monolingual subtitles, but you can still load an SRT file for additional corrections. An advantage of using DeepTranscript is explained in section Translated transcriptions.
The final output is a set of caption files that will display subtitles over a video player or a WordPress website. Below is a sample 3‑hour video used to illustrate the process. Subtitles have been created in the video’s source language (English), and then translated to French, Spanish and Italian.
How it works
To create the transcription file in the video’s source language, first export your video to an MP3 sound file.
If you are using WhisperTranscribe, export the result as a ‘srt’ (subtitle) file. Caption Manager will automatically convert it back to a transcription file.
If you are using DeepTranscript, you may need to cut the MP3 file into fragments that fit within the program’s size limits (approximately 1 hour). Export each transcription as a tabulated text file. The extensions of these files may be « txt » or « tab ». If you’re using DeepTranscript, you’ll first need to export the transcription as a CSV file. Then load this CSV file into a spreadsheet program and export it as tabulated text without the quotation marks as text markers.
Once your files are ready, go to this page to upload them and enter your settings.
👉 To start a session, you will be asked to perform a small calculation and write the result in French… This is to prevent robots from saturating the service. Pay attention to the ‘plus’ versus ‘moins’ (minus) operation !
The settings mainly include the output file name (which will usually match the video file name), the minimum duration of a subtitle and the maximum length of each subtitle. By default, the minimum duration is set to 800 milliseconds and the maximum length to 15 words.
Since speech analysis devices work on breath units which may contain more than 15 words, subtitles will often need to be broken into smaller units. Caption manager will break them up and fix them at the correct (interpolated) times.
This program produces ‘srt’ (SubRip), ‘sbv’ (SubViewer) and ‘vtt’ (WebVTT) caption file (subtitle) formats. All of them are compatible with VLC and may be acceptable choices for YouTube. The ‘vtt’ format is needed by the default video player in WordPress sites. In addition, it is the only one that accepts the non-breaking spaces required by French punctuation, and the standard format for YouTube. None of these formats are recognised by the QuickTime video player.
A few formatting tags such as italics and bold are accepted in subtitles. Line breaks are also accepted to denote speech turns in a dialogue.
Turn-taking can be taken care of by displaying the names of the new speakers in the first subtitle of their turn to speak. This is done automatically once speaker tags have been entered in the first column of the transcription table.
Extra features
Glossary
When building a caption file, it is possible to make automatic replacements recorded in a ‘replace’ file. This is a two-column tabulated file, the left containing the string to be searched, and the right its replacement. Replacements are case-sensitive.
Underscores ‘_’ can be used to replace spaces ; they are automatically converted to spaces when the glossary is loaded.
This glossary can be used, for example, to restore capital letters that were forgotten during speech-to-text conversion. It can also be used to insert formatting tags :
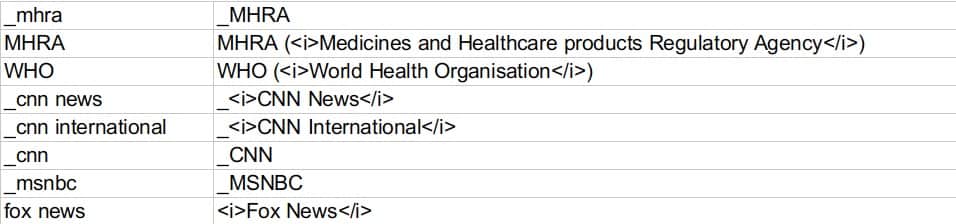
Note that it may be necessary to place spaces before and/or after search strings to identify them as whole words. Care should also be taken to avoid self-embedding rules (such as those on the second and third lines), as these would create unwanted repetitions when glossary rules are applied multiple times.
Another feature (PREG_REPLACE) is available for geeks familiar with regular expression syntax : files containing sets of replacement strings applicable to preg_replace() commands (in PHP syntax). These preg_replace() rules are applied before the glossary search-and-replace rules. As shown below, their sensibility to context solves the problem of repeated self-embedding rewrites.
Merged transcription files
We recommended fragmenting the MP3 exports of the video soundtrack so that they can be processed by an online speech-to-text service. This may yield several transcription files. To facilitate an automatic translation of the entire set of subtitles, you will need to merge these files into a unique one, while at the same time applying changes programmed in the glossary.
Translated transcriptions
Translation is provided free of charge by online services such as DeepL Translator.
It is recommended to perform the translation on a transcript file that is structurally similar to the one produced by DeepTranscript. This is because the transcription mechanism has performed a segmentation based on breath units. That segmentation is also optimal for machine translation. It is not a good idea to try to translate the contents of « srt » , « sbv » or « vtt » subtitle files, because their segmentation has been modified to suit the maximum length of subtitles. Due to this, WhisperTranscribe may not be the best choice for multi-language subtitles.
Note that the output of DeepL Translator won’t be a well-formed transcription file, unlike the one you got from DeepTranscript. The main reason is that DeepL Translator ‘translates’ tabulations to spaces. Worse, it can insert unwanted spaces in timecodes, for example replacing ‘234.5′ with ‘235. 5’ and replace dots with commas in floating-point timings when translated into French.… Caption manager will fix all these errors and handle the translated transcription as a well-formed file.
Reference files
Caption manager can correct the content of a transcription file by comparing it to a reference file. The reference file is a plain text version (without time codes) of the transcription that you have manually created or edited.
The use of reference files saves the trouble of using REPLACE (glossary) or PREG_REPLACE files.
Upload the reference file(s) in the same order as the transcription file(s). A button called FIX THE TRANSCRIPTION FILE(S) will then appear. Clicking on this button will automatically fix ‘001.txt’ and so on. The process is shown in a pop-up window.
The Test only option is selected by default. This allows you to check the process before saving the transcription file that will replace the previous version.
This process is very powerful when translating subtitles.
Let’s look at an example. With Whisper Transcription Pro, I created both an ‘srt’ subtitle file and a full text transcription file of the audio track of a video in English. Using DeepL Translator, I then translated both into French.The ‘srt’ file is needed for its timecodes, but the full text translation is much better. So the challenge is to replace all the text in the ‘srt’ file with equivalent versions taken from the full text (reference) translation.
Read the original ‘srt’ file and the reference text.
Once the ‘srt’ and the « reference » files have been uploaded„ clicking on the FIX THE TRANSCRIPTION FILE(S) button will display this text which clearly shows how the subtitles will be modified and their timecodes realigned accordingly.
Let’s look at the first three subtitles. The English source is in italics :
1
00:00:00,040 –> 00:00:05,060
What if everything that Big Pharma told you about migraines is a lie ?
Et si tout ce que Big Pharma vous a dit sur les migraines était un mensonge ?2
00:00:05,210 –> 00:00:10,900
Now, given approximately a quarter of the population experiences migraines,
Sachant qu’environ un quart de la population souffre de migraines,3
00:00:11,240 –> 00:00:14,440
this story is very likely to affect you or someone you love.
cette histoire est très susceptible de vous toucher ou de toucher quelqu’un que vous aimez.
These will be replaced by :
1
00:00:00,040 –> 00:00:05,060
Et si tout ce que Big Pharma vous a dit sur les migraines était un mensonge ?2
00:00:05,210 –> 00:00:14,440
Étant donné qu’environ un quart de la population souffre de migraines, il est très probable que cette histoire vous affecte, vous ou l’un de vos proches.
Subtitles [2] and [3] have been merged into one to reconstruct the whole sentence starting at 00:00:05 and ending at 00:00:14.
Now, it may be necessary to break again the sentence as per the settings of Caption manager. Given the settings : maximum number of words = 10, and the standard no-break rules for French, subtitle [2] is broken into two subtitles as follows :
SOURCE :
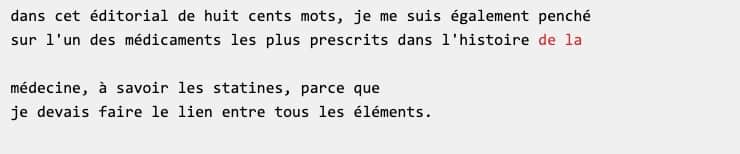
Now, given approximately a quarter of the population experiences migraines, this story is very likely to affect you or someone you love.
Étant donné qu’environ un quart de la population souffre de migraines, il est très probable que cette histoire vous affecte, vous ou l’un de vos proches.Moved down last word(s) ‘très’
#2
00:00:05.209 –> 00:00:09.824
Étant donné qu’environ un quart de la
population souffre de migraines, il est#3
00:00:09.824 –> 00:00:14.439
très probable que cette histoire
vous affecte, vous ou l’un de vos proches.
Read the final version of the ‘srt’ file. The result isn’t perfect because I didn’t edit the transcription and translation, but it confirms that translating sentences gives a much better result than translating subtitles one by one.
The disadvantage of this approach is that the time codes have been modified, making it difficult to superimpose several language versions. To avoid this situation, a two-step method can be used :
- Once you have uploaded several reference files, click on the ADJUST REFERENCE FILES button. This will open an editor where you can arrange the sentences so that all the languages match. Then click the FIX TRANSCRIPTION FILE(S) button to match these transcription files to the reference files, as explained above.
- To finalise the transcription files, click the ADJUST TIME CODES button. In Test mode you can check if the time codes are satisfactory. If not, return to step 1.
Reader-friendly layout
Caption manager does its best to make subtitle text as easy to read as possible. Each subtitle occupies several lines of approximately equal length. Correct line feeds will be produced if the machine has been instructed on the maximum number of characters on each line. The default is 70 because the WordPress Gutenberg video player creates frames with space that allows for about 75 characters per line.
Another useful feature is the ability to control the position of the breaks between successive captions. Reading becomes difficult when certain words appear at the end of a caption or are moved to the next caption. To do this, Caption manager requires lists of « non-breaking » words that should not appear at the end of a caption. Each list is associated with a specific language.
For instance, look at no-break-fr.txt and no-break-en.txt. A few words are summarised as regular expressions. For example, in French, /\s[Ll][ae]\s/ matches le, la, Le and La, and /\s[Dd]es?\s/ can match de, des, De and Des. As matching is case sensitive, it is necessary to include upper case variants, which can be easily combined in regular expressions.
Reordering requires moving words either back or forward. Let us see how it works. Consider the following sequence of captions :
Since words « de » and « la » are listed in no-break-fr.txt, this sequence will be rendered in the ‘forward’ mode as :

and in the ‘backward’ mode as :

These two options can be compared on this excerpt :
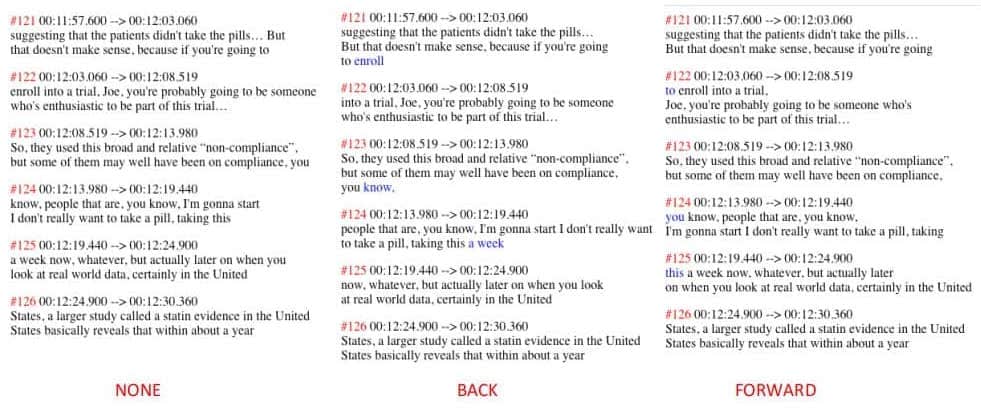
The ‘forward’ mode is the default option because it seems better to delay text in subtitles than to move it backwards.
Details of the process
The source video was copied (via a screen capture) from The Joe Rogan Experience (April 2023 lien:kow3). There are some irregularities in the streaming : frames tend to freeze, although the audio track remains continuous. In principle, this is not too much of a problem with speech data.
Due to the length of the video (3 hours), the MP3 sound track was sliced to three one-hour segments, namely 1.mp3, 2.mp3 and 3.mp3. I used the (excellent) TwistedWave audio editor on the Mac to do this. Cutting points need to be set at the end of sentences.
Each of the three sound files was submitted to DeepTranscript which transcribed them as text files. These were exported in tabulated text format : “1.txt”, “2.txt”, “3.txt”. (You can download these examples.) The ‘tab’ extension is another valid option.
Transcription files were checked in a spreadsheet editor — such as Excel, PlanMaker, etc. — to make sure that timecodes (in seconds) are displayed as floating point numbers. You can see an example of the transcription (1.txt) in its Excel/PlanMaker version : download “1.xlsx”. Since a French version of PlanMaker was used, floating point numbers have commas instead of dots ; both are acceptable.
The first line of 1.txt does not contain significant data. It will automatically be skipped by Caption manager. The first column, renamed ‘track’, will be used for tags identifying speakers — see Speakers and turn-taking below. Value “0,0” will be converted to plain ‘0’ which means “no change.” The first column has been deleted in 2.txt and 3.txt ; this is no longer necessary.
These transcription files are not suitable for displaying subtitles on the video, at least for the following reasons :
- Their format is not a recognised standard for use in video players.
- Lines are of very variable lengths because DeepTranscript worked on breath units to segment the transcription. For instance, text on line #14 would not fit into a single video frame.
- Their content is “raw” and notably contains misspelled proper names. For instance, “Bhattacharya” is transcribed as “bada charia”! Also — one of the worst cases — “ivermectin” as “ivamechton”… In addition, all text appears in lowercase. Still, these errors are consistent in the sense that they can be fixed by the rewrite rules of a glossary.
- We need to merge the three transcription files to produce a unique caption file. This is not just a matter of copy-paste. The time codes should add up continuously from the first to the last part.
You should try to automate corrections by using a glossary and/or sets of regular expression rules. Create a file named replace-en.txt in your text editor. Type the search expression at the start of each line. Then type a tabulation and type its replacement.
An example of the English glossary for this video is here : replace-en.txt.
The same procedure works for regular expressions : create a tabulated text file preg-replace-en.txt containing pairs of arguments for preg_replace() instructions (in PHP syntax) and upload it. Note that this set contains rules that won’t be self-embedding because of using contexts (notated ‘$1’, ‘$2’, etc.). This means that applying the same set of rules multiple times does not create unwanted repetitions.
Below is a screenshot of the top of the homepage of Caption manager after uploading the three transcription files, automatically renamed 001.txt, 002.txt and 003.txt, and the correction files used by all these fragments : a glossary file renamed replace_001.txt, a regular expression file reg_replace_001.txt, and a non-breaking list of words no_break_001.txt (see Reader-friendly layout above):
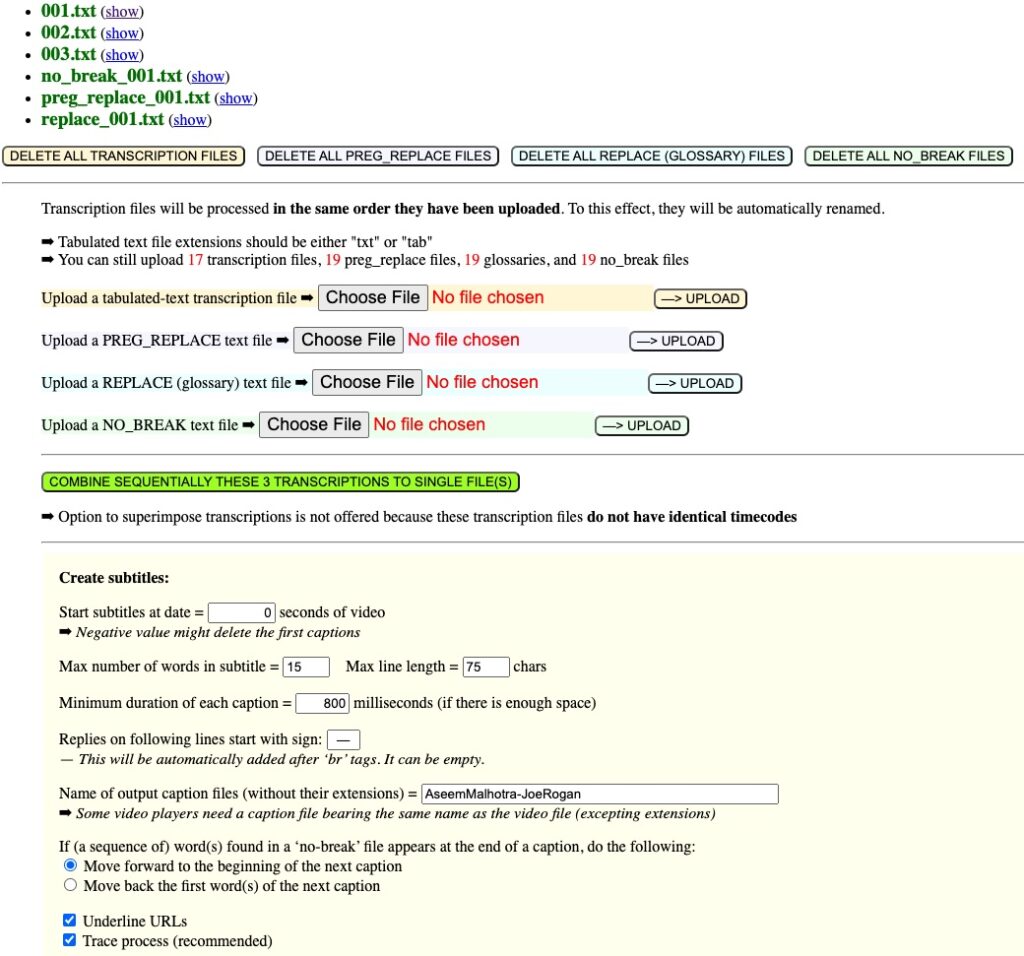
Clicking button COMBINE SEQUENTIALLY creates unique files merging the three transcription files : new_transcription.txt and new_transcription-hms.txt, with timecodes respectively in seconds and in the hour-minute-second format as suggested by ‘hms’. This can be useful if you want to work on a single transcribed file instead of three. The contents of replace_001.txt, reg_replace_001.txt and no_break_001.txt are ignored in this process.
Create subtitles in the source language
On the Caption manager page, upload 1.txt, 2.txt, 3.txt (in this order) and correction files as shown in the previous section. Then enter a name for output files — here for example, “AseemMalhotra-JoeRogan” — and click CREATE A SET OF CAPTION FILES (at the bottom of the page). This produces caption files in the three formats (srt, sbv, vtt), plus a composite transcription file, here named “AseemMalhotra-JoeRogan-hms.txt”.
Files replace_001.txt and reg_replace_001.txt have been used to modify all these files. File no_break_001.txt has been used for creating captions.
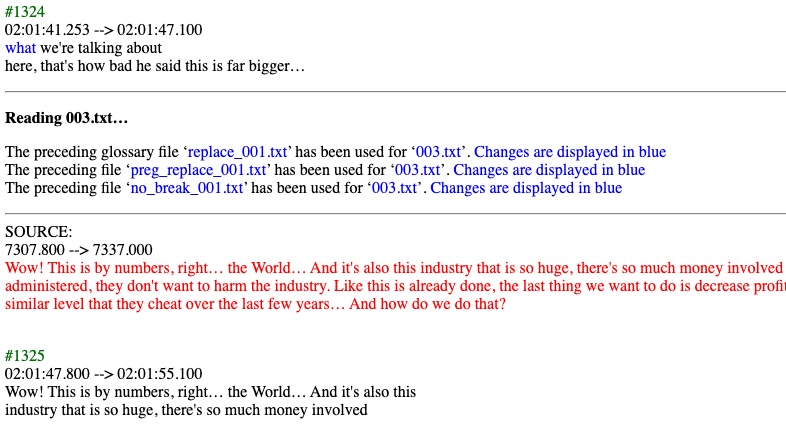
The following is an extract from the trace showing the transition from 002.txt to 003.txt and the continuity of the timecodes (broken at 02:01:47.800, i.e. 7307.800 seconds). It also confirms that the same files (replace_001.txt, reg_replace_001.txt and no_break_001.txt) have been used for corrections :
If the name of the caption file (in any of the three formats) is identical to the name of the video file (excluding their extensions) and if they are on the same level, VLC will read the video and display subtitles. A great feature of VLC is that by clicking on the left and right arrows, you can move backwards and forwards by 10 seconds, which is very convenient to re-read a fragment.
A pleasant surprise : the size of the subtitles is now much more in keeping with the frame of the video. The main reason is that a parameter Max number of words in each caption has been set — to 15 by default. Only words longer than 3 characters are counted. So, long entries (such as line 14 of 1.xlsx) have been split into several subtitles with their time codes interpolated word-wise.
Caption manager also takes care of the minimum duration of each subtitle (800 milliseconds by default). The time codes are adjusted so that the subtitles never overlap with each other.
Now it is time to edit 1.txt, 2.txt, 3.txt in a plain text editor — e.g. TextEdit on a Mac. Read the subtitles while playing the video (preferably at slow speed) and edit the transcription files.
Edit transcription files 1.txt, 2.txt, 3.txt to fix errors that cannot be fixed by the glossary. Then click DELETE ALL TRANSCRIPTION FILES, and upload them again. Click again CREATE A SET OF CAPTION FILES. This will produce the final forms of subtitle files in the three formats (srt, sbv, vtt).
When captions are created in ‘vtt’ (WebVTT) subtitle format, options are provided to change the colour of text in sections enclosed by <b>, <i> and <u> tags :

Colour names will be accepted if compliant with standard HTML color names. Currently, these colours are displayed (on Mac) by Chrome, Opera, Brave browsers, yet neither Firefox nor Safari. In addition, as shown above, several video players do not yet recognise CSS « ::cue » formatting.
Note that this procedure also produced a file “AseemMalhotra-JoeRogan-hms.txt” which contains the whole set of captions once corrected by replace-en.txt and preg_replace-en.txt. Rename it for instance AseemMalhotra-JoeRogan-hms-en.txt. This is the file you will use now for a final editing of the text, or to create translations. Here ‘hms’ means that the timecodes are expressed in hours, minutes and seconds instead of just seconds ; this is the way most video players display them.
Create subtitles in different languages
To create translated subtitles using DeepL Translator, it would be a bad idea to send ‘srt’, ‘sbv’ and ‘vtt’ files directly for translation. This is because they contain subtitles that are spread over several frames (due to the 15-word limit). This can lead to inaccurate translations. It is therefore better to work with transcription files, as they contain subtitles segmented by breath units, which make more sense to the automatic translator.
So, we need to reconstruct a unique transcription file by merging 1.txt, 2.txt and 3.txt, to which glossary search-replace rules will be applied. To this effect, you can use « AseemMalhotra-JoeRogan-hms-en.txt » which you downloaded earlier. You may also do the same by a single click on button COMBINE SEQUENTIALLY THESE TRANSCRIPTIONS TO SINGLE FILE. The name of the file created by this process will always be new_transcription.txt — download it to see an example. Let’s use this name for the following explanations.
You may notice that HTML tags for italics, bold, emphasized or strong text have been replaced with non-standard tags [i], [/i], [b] and [/b]. The reason is that DeepL Translator tends to delete or modify few HTML tags. These tags will automatically be restored to the standard HTML format when producing caption files.
Of course, manual stylistic editing of new_transcription.txt is mandatory before translating it. If you are not a native English speaker, you will appreciate the help of Grammarly. Note that it offers the option of several variants of the language : British, American, Indian, Canadian and Australian English.
Open new_transcription.txt in a plain-text editor, copy its contents and paste it into DeepL Translator, after choosing the target language. (You may need to run a premium version if the text is long.) Then, copy the translation and save it as a text file, e.g. transcription-fr.txt.
Whatever the automatic translation tool, since the source text is a transcription of natural speech, which means incomplete sentences, missing or repeated words, etc., the result is likely to be poor. Big-data translation tools tend to guess missing fragments, which leads to errors. Therefore, the translation of transcriptions must be carefully edited by native speakers. For instance, this file is the raw version of transcription-fr.txt and that one its final version — after hours of final editing by hand !
In this example, a Spanish translation is also visible, but transcription-es.txt is the raw, unedited, version created by DeepL Translator. Native readers of Spanish should submit revised versions…
It might be a good idea to use ChatGPT for these translations, adding suitable stylistic specifications, but its current free version (3.5) has a too-small limit on the length of the text.
Now you need to create caption files in the three subtitle formats using this (unique) transcription file. Click DELETE ALL TRANSCRIPTION FILES and DELETE ALL GLOSSARY FILES, then upload transcription-fr.txt and click on the CREATE A SET OF CAPTION FILES button.

You’re almost there ! However, you still need to correct translation errors, particularly in relation to technical or scientific terms that DeepL Translator may have misunderstood. A typical example in this interview is “keyhole heart surgery” (time 56.3 seconds) which was translated “chirurgie cardiaque par trou de serrure”!
To fix this (and other) errors, you should create a specific glossary file, e.g. replace-fr.txt. It would contain the following rewrite rule :

A more general version of this rule is programmed, using a regular expression, in preg-replace-fr.txt. It replaces both « chirurgie d’urgence de trou de serrure » and « chirurgie trou de serrure » with « chirurgie cardiaque minimalement invasive (keyhole heart surgery) ». The same problem occurred with Spanish and Italian translations, as the translator is unfamiliar with the original English expression. It is also safe to replace “cardiac” with “cardiovascular” as these are not equivalent in Roman languages.
For regular expression geeks : the same regular expression file contains rules creating French chevrons quotes along with their non-breaking spaces :
[\"«]\s*([^"^»]+)?\s*[\"»]	«[nbsp]$1[nbsp]»
\s“\s*	 «[nbsp]
\s*”\s	[nbsp]»
This method is not perfect because sometimes DeepL Translator forgets a few opening or closing quotes. This happened only once in the 3‑hour sample video. So, it covers most cases.
Reading the final caption file, first with a text editor and then as real subtitles with VLC, will give you the opportunity to correct errors, preferably using glossaries and regular expression rules, otherwise in the source transcription file new_transcription.txt.
Multi-language subtitle mixing
Once subtitles have been translated into different languages, it is possible to display two (or more) languages together at the bottom of the video. This has been done on the video shown as an example.
Remember that we have two transcription files containing all the English and French subtitles. Their timecodes are identical because they were created by DeepTranscript and left unchanged by DeepL Translator.
Upload the English transcription, then the French transcription which will be renamed 001.txt and 002.txt respectively. If the timecodes of 001.txt and 002.txt are identical, the following will be displayed :
Then upload the English and French glossaries (in the same order). These will be renamed replace_001.txt and replace_002.txt respectively. You can do the same with regular expression files that will be renamed preg_replace_001.txt, preg_replace_002.txt, and optionally with the non-breaking rule files which will be renamed no_break_001.txt and no_break_002.txt. As you might guess, each glossary, preg-replace and no-break file will be applied to the transcription file with the same number. Other language versions (and their respective glossaries) can be added at this stage.
You can apply simple HTML formats supported by video players : italics or bold. This makes it easier to draw attention to the languages in the video. Here we have chosen ‘italic’ for the English text and no formatting for the French text.
If ‘italic’ is selected, italic text will be converted to bold, and vice versa.
An optional token, by default « ~•~ », can be set to create blank lines separating language versions. Leave it empty to remove these empty lines, an option which is generally satisfactory when versions have different colours. In the current ‘vtt’ (WebVTT) format, colour is only applied to bold or italic text (see above), which is not optimal.
As two (or more) subtitles will be displayed within the same frame, it may be useful to reduce the maximum length of each subtitle. For bilingual subtitles, we generally set the limit to 15 words.
At last, click on the CREATE A SET OF CAPTION FILES BY SUPERIMPOSING THESE TRANSCRIPTIONS button.
Subtitles in consecutive languages
This is the case of a video in which several languages have been used consecutively in different parts. It is easy to deal with this situation : segment the MP3 sound file into fragments containing only one language. Transcribe and translate them separately. Then upload them in alphabetical order, creating 001.txt, 002.txt, etc.
Create a glossary for each language and upload the glossary files in the order they are needed : replace_001.txt, replace_002.txt, etc. The same glossary may need to be uploaded several times if that language appears in different fragments.
If a glossary is missing, the previous one will be used. For example, if transcription file 005.txt does not find replace_005.txt, it will use replace_004.txt – or the next non-empty preceding one. The same applies to regular expression files. Note that this is the case when you are dealing with a sequence of transcription files with a single glossary and/or regular expression file.
Speakers and turn-taking
The first column of the CSV tables produced by DeepTranscript contains a variable called ‘channelId’ which we have so far ignored. This column can even be deleted without disturbing the Caption Manager process. By default, each of its cells contains the number ‘0’. We will now use it to specify the speakers, or rather the changes of speakers, namely the turn-taking.
Our convention is that a value of ‘0’ (or an empty cell) means “no change”. You need to assign a tag to each speaker. The suggested method is to use whole numbers : 1, 2, 3… The initials of the speakers can also be used to this effect. Spaces will be automatically replaced by underscores ‘_’.
You don’t need to fill all the cells with speaker tabs. Just fill in the cell where the speaker starts to speak. The zeros will take care of keeping the information.
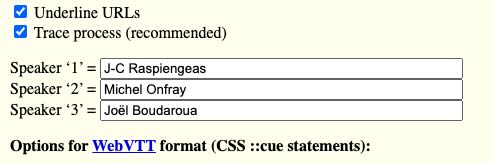
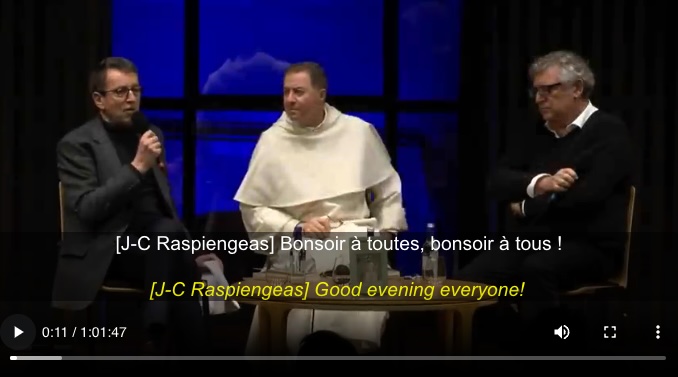
Then load the edited transcription file (tabulated text format) into the Caption manager page. The program will create and display a list of speaker tags, along with editable fields where you can enter the full names of these speakers. For example, in the video Michel Onfray – ‘Théorie de Jésus’, three speakers have been tagged ‘1’, ‘2’, ‘3’ and their full names have been entered in the corresponding fields — see picture.
These full names will be saved in your project’s settings when you create subtitles or transcription files. (For geeks : they are also saved as a session variable…)
The full name will appear at the beginning of the subtitle in ‘square brackets’ at each turn. Another options is ‘underscore’, which may benefit of setting a different colour for underlined text.
Delete fragments and/or insert silences
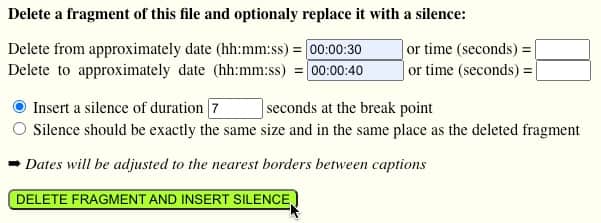
It is often the case that a video that has been subtitled needs to be edited. In particular, we may want to delete a fragment and/or insert a silence. To do this, load the transcription file, go to the bottom of the page, and set the times or dates of the beginning and end of the fragment to be deleted. Also, specify the duration of the silence that will replace this fragment, in case there is one.
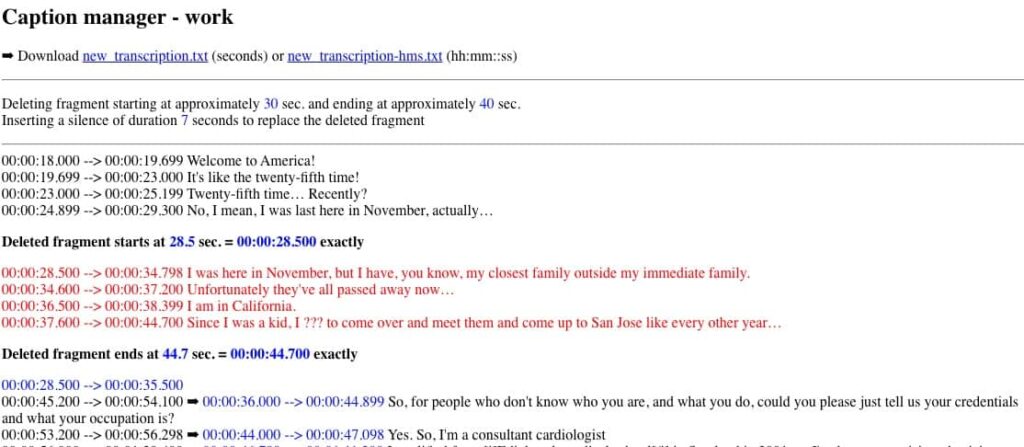
A trace of this process would be as follows :
Download the resulting new_transcription file in either time (seconds) or hh:mm:ss format.
For a clean cut, the exact break points should coincide with the beginning and end of the first and last captions to be deleted. We had set the start to approximately 00:00:30 and the end at approximately 00:00:40. The start date falls within the interval of a caption with time codes 00:00:28.500 to 00:00:34.798. This means that the actual start date of the deleted fragment should be 00:00:28.500, which is 1.5 seconds earlier. The end date falls within the interval of a caption with time codes 00:00:37.600 to 00:00:44.700. Therefore, the end date of the deleted fragment should be 00:00:44.700, which is 4.7 seconds later. These are the exact values that need to be used when editing the video file.
The dates of the subtitles following the deleted fragment have been increased by 7 seconds as specified. Similarly, when editing the video file, a 7‑second blank fragment must be inserted.
A blank caption starting at 00:00:25.500 and ending at 00:00:47.700 has been added for convenience. It can be completed with text or deleted later.
This procedure can be used to insert a silence without deleting a fragment : simply enter the desired position of the silence as both the start and end date of the “deleted” fragment.
Of course, if you are subtitling in more than one language, each language transcription file should be edited with exactly the same parameters.
Change timecodes
This feature is very similar to the preceding one.
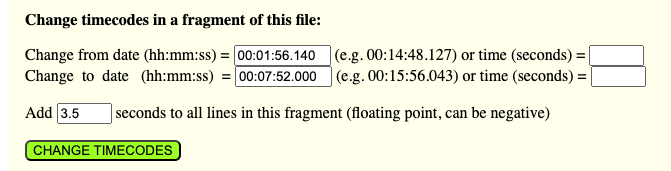
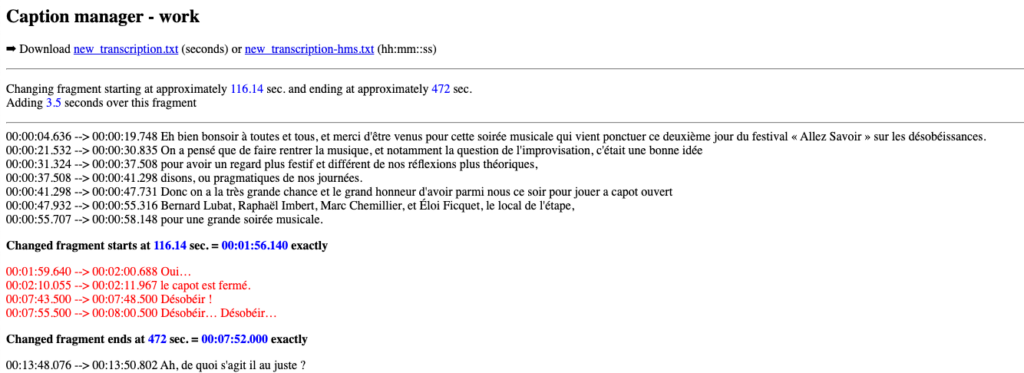
Enter the start and end dates (or times) of the fragment you want to modify and the number of seconds to add to its timecodes. This « Add » number can be negative and in floating-point format.
The trace will show changes in red and if you are satisfied, you can download the modified file with its time codes in seconds or hh:mm:ss.
Create an index
Once a WebVTT caption file has been created, it is easy to create an index of the contents with active HTML links pointing at precise moments in the video. This has been done on my page Aseem Malhotra interview.
To this effect, a specific page has been created, named “AseemMalhotra-JoeRogan.php”, which contains the code of the Plyr.io media player in a PHP environment. This file has been uploaded to the “video” folder. The <source> element has been modified as follows :
<source src="https://lebonheurestpossible.org/cloud/AseemMalhotra-JoeRogan.mp4#t=<?php echo $t; ?>" type="video/mp4">
Variable $t is captured from the URL, allowing for either seconds or time (hh:mm:ss) format :
if(isset($_GET['t'])) {
    $t = $_GET['t'];
    if(is_integer(strpos($t,":"))) {
        $timeParts = explode(':', $t);
        $seconds = 0;
        if(count($timeParts) === 2)
            $seconds += $timeParts[0] * 60 + $timeParts[1];
        elseif (count($time1Parts) === 3)
            $seconds += $timeParts[0] * 3600 + $timeParts[1] * 60 + $time1Parts[2];
        $t = $seconds;
        }
    }
else $t = 0;
So, for instance, link 02:23:33 opens a new window and plays immediately the referred fragment. This link can easily be copied and pasted on a remote HTML/Javascript page :
<a onclick="window.open('https://lebonheurestpossible.org/video/AseemMalhotra-JoeRogan.php?t=02:23:33','Malhotra','width=1200,height=700'); return false;" href="https://lebonheurestpossible.org/video/AseemMalhotra-JoeRogan.php?t=02:23:33">02:23:33</a> The triangle that moves the mountain
A better implementation also sends language information to the video player to display the appropriate subtitle version. A link to the same fragment 02:23:33 with Spanish subtitles by default would look like this :
<a onclick="window.open('https://lebonheurestpossible.org/video/AseemMalhotra-JoeRogan.php?t=02:23:33&lang=es','Malhotra','width=1200,height=700'); return false;" href="https://lebonheurestpossible.org/video/AseemMalhotra-JoeRogan.php?t=02:23:33&lang=es">02:23:33</a> El triángulo que mueve la montaña
using the following code in “AseemMalhotra-JoeRogan.php”:
Sharing editorial work
Access to your workspace is granted or denied based on your IP number. If you change location while working on a project, you must be able to access it from a different IP number in the connection. This applies to partners working on the same project.

To enable this, Caption manager displays a secret key that you can copy and send to your guest editor. The editor will open Caption Manager on their side, paste the secret key to the form and click button “GO!”. Beware that after three unsuccessful tries their IP will be blacklisted ! Contact the admin if this happens…
The content of your workspace is retained for 48 hours. Each time you (or a guest editor) access it, a new 48-hour period is granted. If left unused after this period, the workspace will be automatically deleted.
Example
Below is the video (duration 3 hours) of an interview with Dr Aseem Malhotra, automatically transcribed with DeepTranscript, revised with the help of Grammarly, and translated to French with the help of DeepL Translator. This process takes advantage of these big data platforms so that it requires a minimum of manual intervention. In practice, a careful editing work is required to finalise the captions — and to create lexical rules that can be used for future work.
The video is displayed by the standard Gutenberg video player. After that, other players based on WordPress plugins will be shown.
Standard Gutenberg HTML5 video player in WordPress
With English or/and French subtitles
This video is displayed from a Google Cloud source.
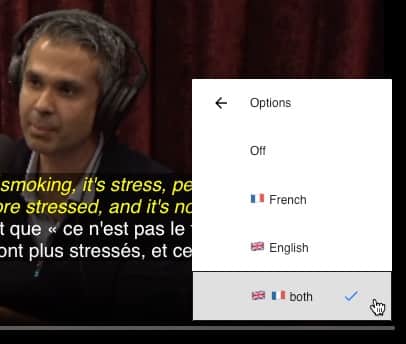
On the bottom right of the frame, click the vertical three periods, then point at “Options” and click flags to select languages. Sorry for the use of country flags, but language flags are not available in Unicode…
➡ This is an ongoing process : only the first two hours have been revised, so far, to show what can be achieved with a few manual corrections. The last hour is almost “raw”, only produced by the automatic tools.
This standard Gutenberg video player requires no special installation, but it has one major drawback for its use with technical and/or foreign-language podcasts : the lack of rewind and forward buttons that allow you to skip approximately 10 seconds at a time.
More video players (script-based)
Below are two players installed as scripts using a CDN. Be aware that they are displayed differently on different browsers and/or systems. It is a good idea to check that all required options work correctly on mobile phones.
Videojs HTML5 Player is an advanced project in terms of options. With the help of ChatGPT ! I was able to place the elapsed time display at the bottom left of the frame. In the following example, I could set the background colour and opacity, font family, and change these settings in full-screen mode, but the font size does not yet work. This issue is being discussed on the forum.
Apart from the font size issue, which will hopefully be resolved soon, a major drawback of this player is that it does not apply colours set by « ::cue » selectors in the WebVTT file. Its advantage over the standard Gutenberg player is the existence of (programmable) skip buttons.
Another powerful tool, my favourite at the moment, is the Plyr.io media player. It misses skip buttons on several browsers, but left-right arrows allow backwards-forward jumps of about 2 minutes on some browsers, and ± 5 seconds on others, as instructed by the seekTime parameter. In addition, skip buttons are visible on iPhones, although they skip the time by 10 or 15 seconds, depending on the context.
➡ Note expression « #t=0 » in the <source> element. This is the code needed to start the video from a defined point, as shown below.
More video players (plugins)
Below are a few players installed as WordPress plugins. Some of them do not have rewind and fast forward (skip) buttons, or these buttons are used to jump to the previous or next video track in a playlist.
WPlyr video player has all required features, but it only displays video files stored on a local source, namely this website (embarked MP4 file). Trying the same with a Google Cloud source, it doesn’t work. This will place an excessive load on the site when many users are watching its video(s). For this reason it is not displayed here.
CP Media Player has a very clear display of subtitle texts, notably in the full screen mode. It had a conflict with the MEKS audio player used on this site, but this was resolved by adding an extra parameter to the shortcode, which yielded :

Unfortunately, the current version (1.1.0) of CP Media Player does not (yet?) have rewind/forward (skip) buttons. In addition, there is a large, unwanted white space at the bottom of the frame after a return from full screen.
Warning
The confidentiality of the data you process with this service is not guaranteed : someone sharing your Internet access (IP address) could find it and export the content. This content (your workspace) is however automatically deleted after 48 hours of non-use. Furthermore, you can click DELETE ALL FILES buttons at any time.

 Partager